


This blog describes how I added power windows to our Oka.
Since the Oka front door windows are belt driven, very heavy and different to other cars, I thought that fitting power windows would be difficult, if not impossible, but it wasn't impossible.
There are no doubt other ways to do it (there are many American websites selling power window lifters, or regulators as they call them, of many different types for all manner of vehicles, but not Oka of course), but this way was quite simple and effective.
I bought a 2 door power window kit from Rapid Electronics in Melbourne via ebay for $95 plus $20 shipping. There are other suppliers and types available as well but the kits are not available all the time. However they reappear regularly for around the same price. Delivery was very quick and most kits seem to use the same rectangular silver drive motors now, which are claimed to be "high power", which is encouraging.
How do they work?
To see how they work, visit these sites. Installation Guide #1 and Installation Guide #2.
OK, so they are shown being fitted to an old Holden, but the principles and operation are the same, and they show far more detail than I was intending to.
I have not yet determined the longevity of the motors and drive assemblies on an Oka, but on short term testing they seemed OK, even though the motors do take a fair whack of current (10+ Amps, over 120 watts, when closing the windows) and get pretty hot.
Fitting them to an Oka
To fit them to an Oka means the following operations:
- Remove the door handles, grab handles and window winders from both front doors.
- Remove the christmas tree fixings and remove the plastic trim
- At some stage you'll probably want to remove the door stays too, either to be able to open the doors further or when they get in the way.
- Releasing the tension on the friction slide mechanism.
- Greasing the window slide channels on both sides and the belt slide channel. I used lithium grease but there may well be better products for this purpose.
I used to have the slide friction pads tightened up as much as possible to stop the windows from sliding down and rattling on rough roads. With the electric version, the worm drive on the motor unit should prevent the motor from being turned by the window and keep it tightly shut. We'll see.
[Post trip note: Yes, the worm drive DID prevent the windows from rattling or sliding down. This was after a 14,000 km outback trek including the Anne Beadell Highway, Great Central and Sandy Blight Junction Roads.]
Locating the Motor Drive Assembly
Fitting the power window motor assembly took some trial and error. I tried 3 or 4 different locations:
- Option 1: In the well above the grab handles, or in the cut out near the door catch.

In the well didn't work out since the motor, although thin, is too fat and fouled the door trim and/or the window glass, although the belt is nice and straight. In the cut out near the door catch would have worked fairly well with the belt skirting around the bottom of the door handle bracket.
- Option 2: In the space just above the floor but below the door trim.
- Option 3: In the cut out near the door hinges.

I thought this would foul the window glass when wound down but it didn't, and proved to be the most suitable location.
The door trim fits back almost perfectly, except for a slight bulge where it goes over the drive belt beneath the door stay. This is almost unnoticeable.
The motor drive belt is designed to be bent around as long as the centres of the motor and drive cog are not less than 30o mm apart. In this configuration they end up about 400 mm apart.
- Option 4: I have power door locks fitted to our Oka, bits of which fill up the other cut out near the door catch, otherwise that area might have been a possibility too, with the belt skirting beneath the door handle bracket. Fitting the cables from here would be more difficult.
Mounting the motor drive assembly and securing the drive belt cog is not difficult with the items supplied, just a bit of cutting, bending, drilling and screwing. Most of the other bits in the kit are intended for use in cars where the noise and vibration of the motor might be distracting. Not a critical Oka concern.
I fitted a piece of rubber sheeting between the motor body and the door skin too avoid any scuffing or noise as the motor vibrates. It's no noisier than a normal car power window.
The drive belt will foul the body of the door stay slightly as the door closes, so a small strap was fitted to pull the belt closer to the door skin and out of the way of the door stay.
If you locate the drive motor here, drill the 12mm cable hole in the door through the cutout before mounting the motor.
Assembling the Drive Mechanism
Assembling the drive cog on the window winder was also easy, at first.
A large number of different cogs, gears and spacers are provided in the kit to suit different cars. We don't need any of them.
With the window winder removed, the shortest of the large nylon cogs fits neatly over the splined shaft, and the drive belt cog from the motor slips over the nylon cog to drive the window winder up and down. In theory.
Having assembled the cogs and mounted the motor and drive belt, I hooked up a 12v source and tried it out. It worked reasonably well on the drivers door, but when I tried it on the passenger door, a problem arose. Over the years, the tops of the splines had worn down so when the window reached the top and stopped, the power of the motor continued to turn the drive cog which slipped around, wearing off the peaks of the nylon cog on the worn down steel splines. If this didn't happen now, it was certainly going to happen sometime soon, so another approach was needed.
Soft nylon turning a steel splined shaft at high torque is not a good match. What was needed was a mechanical locking method to tie the splined shaft to the nylon drive cog. (I figured that there was less torque on the teeth of the larger drive belt cog from the motor (twice as big, therefore a 1/4 of the torque??) and so it was going to last longer, so I focused on the smaller cog).

First I removed the splined shaft from the window winder mechanism by releasing the (quite strong) circlip holding it in and removing the plastic spacer and shaft. It was easier than I though it would be.
(Note: When replacing it, ensure that the ends of the internal spring are correctly located in the shaft cut-out.)
Then I made a round steel plate the size of the nylon cog (and so the end of the drive belt opening would slip over it) and drilled a 5mm clearance hole in the centre. (The original window winder handle is held on to the splined shaft by a 5mm bolt).
I drilled a series of 2mm holes in the plate, 4 around a small circle which coincided with the end of the splined shaft, and 4 which coincided with the ring of the nylon cog. I then fitted the nylon cog to the splined shaft and cut it down flush with the end of the splined shaft.

After mounting the plate on the splined shaft with a 5mm bolt, I drilled through the holes in the plate using a 2mm drill, into the end of the splined shaft to a depth of 6mm, and right through the nylon cog.
This is best done on a pedestal drill for stability and accuracy and after drilling the first hole, drop a 2mm bolt in it to stop the plate from rotating while the others are drilled.
Mark the plate and shaft so that it can be replaced in the same orientation, unless you can achieve perfection in drilling accuracy.

Having made one plate that fits, it's a good idea to use it as a template for the others and drill them before cutting and rounding the plates. It makes them easier to handle.
They don't actually have to be round, square or octagonal would do, so long as the drive belt cog can fit over it and there is room for the 2mm bolts. Round just seemed a neater solution. There was no need for nuts on the 2mm bolts (there's no space anyway) as I held all the bolt heads in place with another round plate, via a clearance hole in its centre, with a 5mm bolt. Like a sandwich. A blob of Selleys All Clear on the bolt threads would reduce any movement as well.
Using 2mm bolts, (6mm long into the shaft and 8-10mm long through the nylon cog), I assembled the plate to the splined shaft.


The whole assembly is now mechanically locked together with the 8 x 2mm bolts acting as locking pins.
The plates were painted to avoid corrosion before final fitment, as were the holes drilled in the door skin.
Once the system is operating satisfactorily, I shall Loctite the 5mm bolt in place to avoid anything coming loose.
2mm bolts are not the only way of achieving this fix, roll pins or any small steel pins would do, but bolts with heads on are more easily held in position and they do need to be small, there is not a lot of room to move. Small self tappers might also work but they would probably come loose. 3mm bolts might just fit but would be trickier to position accurately.
2mm nuts and bolts are available from Dick Smith and Jaycar Electronics.

4 bolts on each section are probably a bit of an overkill, but it looks symmetrical and strong, and works well.
When the mechanism is fitted finally, there is thin spring/circlip supplied in the kit which must be slipped over the larger nylon cog into a groove, to tie it to the drive belt cog, otherwise it could slide off while operating.
I found in practice that the thin spring came adrift during operation, and I couldn't see any way that the drive belt cog could slip off, it's held on pretty tight by the mounting brackets, so it's probably not essential.
With this mechanical locking system in place, when the window gets to the top, the mechanism now stops with no slipping. However, in this position the motor is stalled and will be drawing maximum current, so it must not be held there for more than a second or so to avoid overheating (and eventual burn out) of the motor. You would hope that the motor design takes account of this situation with a thermal cutout or similar, but how can we be certain?
Originally I was intending to leave the window winder in place to enable some manual assistance to be provided to raise the window if the system struggles, or in the event of a failure to the system. However this is not practical since if the system fails though an electrical fault (eg a blown fuse or burnt out motor, a likely cause with heavy windows), the torque from the worm drive on the motor shaft would prevent the window winder from operating, and with my mechanical shaft locking in place, it can't be easily fitted on anyway. So in the event of either electrical or mechanical failure, the mechanism would have to be removed and the original winder assembly replaced. (Note to self: Mustn't forget to take them with us on our next trip).
Wiring the Electrics
The kit comes with a cable harness and 2 switch assemblies, a double switch for the drivers door to operate the windows on both doors, and a single switch for the passenger door.
Switch housings are provided which can be screwed to the door trim from the inside in the most comfortable position. Alternatively, the switches could be mounted directly in rectangular cutouts in the door trim, if the housings take up too much space. However, there might not be sufficient space behind them for the cables in that orientation.
Cables will need to be fed though the frame of the door and the Oka body to allow connections to be made to the motors and switch assemblies. This will require 12mm or 1/2 inch holes, with grommets to protect the wires.
Drill a hole in the end of the door first through the cutout where the motor will be mounted. A corresponding hole is required in the Oka body about 75mm lower (or higher) than in the door, to provide room for the cables to twist without straining as the door opens and closes.
I was not convinced that the cables supplied would be man enough for the job, especially when raising the passenger window from the drivers side. The wires carry quite high currents across the vehicle and require to be fairly meaty cables.
The main culprits are the White, Blue and Blue/Red cables running across from the drivers door switch to the passenger door motor. They carry the full motor current when raising and lowering the passenger window across all the way from the drivers side, even when the passenger door switch is operated. The positive current to the passengers door is supplied by the White wire which is spliced into the Red wire, which is the primary +12v supply. With the original cables, I was losing about 4 volts across the cables during winding (12v down to around 8-9v across the motor connections). This is far too much and caused the motors to struggle.
The best fix is to replace the full length of the Blue, Blue/Red and White wires with much heavier cables (or put additional cables in parallel to share the load). Also the Red and Black supply wires should also be heavier. Lastly the Pink and Yellow wires to the motors can be made heavier and shorter once the switch and motor positions are finalised. This way the losses are reduced to less that 2 volts. Not perfect but acceptable.
[Post Trek Note: Yes the wiring to the solenoids DOES need to be as thick and direct as possible. The window motors will struggle if the battery voltage is low or the window slides are sticky with dust, especially the passengers side, where the cables are longest.
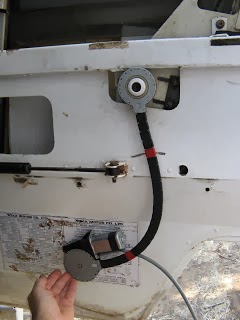
I have subsequently fitted a heavy current earth cable direct into the passenger door (along the door stay from it's mounting bolt) and used 2 relays, driven from the existing wires from the drivers door switch, to operate the passenger side motor. This works much better and reduced the voltage loss to around 1 volt, since it avoids the need for heavy earth currents to run across the vehicle to the drivers side switch and thence to ground.

The relays are normal auto relays but need to be SPDT models having both NO (87A) and NC (87) terminals (eg Dick Smith P8035). Most relays are SPST models with only a single ON/OFF contact connection. We need the changeover function for the system to work.

The relays squeezed in along side the motor. They are mounted on an aluminium plate, offset to ensure there is sufficient clearance with the window glass. Note the gooseneck on the black ground cable from the door strut to allow it to move as the door opens and closes.
You should also check that there is a good earth connection between the main vehicle chassis frame (which the battery ground is strapped to) and the body/cab frame, which is mounted on rubber insulating mountings. If in doubt, bolt a short earth strap between the 2 frames, it will help with other electrical problems too.
Also leave the friction pads slightly touching (but not impeding) the glass, otherwise the glass can slip forward and jam in its tracks].
The system will need a good earth connection and a heavy current connection to the positive battery terminal, preferably direct, not via the ignition switch, so windows can be operated with the engine off. Under the instrument binnacle (in an XT) there is a white 4 way connector which carries the ignition supply to and from the steering column ignition switch. The Orange wire on the left is a heavy current source from the battery and is a good place to tap into the 12v supply. You can clearly see where I have amateurishly tapped in before.

I had previously had problems with the white connector overheating, when the airconditioning was on full fan, and burning the connectors which were presumably higher resistance than they should be. So I have replaced the connector with 4 new heavy duty spade terminals. This enables me to tap into the Orange wire (which connects to the Brown wire from the steering column!) using a 2 way spade connector.
If you don't want the window to be operated unless the ignition is on, connect to the Pink wire (on the left, which connects to the White wire from the steering column), or to operate in the Accessories and Ignition positions, use the Brown wire (on the left, which connects to the White/Green wire from the steering column). Don't use the Purple wire (which connects to the White/Red from the steering column), since this only powers the start solenoid.
Just to add to the confusion, on the Oka wiring diagram, the Purple and Brown wires are not shown. Instead it refers to the Violet commoned with White/Red, Pink, Orange and White/Green. I've drawn a colour coded connection diagram for my own benefit showing the Signal Name, the colour of the wire actually fitted in our Oka, the wire colours as shown in the Oka manual, and the wire colours inside the steering column. Your wiring maybe different.

Note, in the Accessories position, quite a lot of power is being used even if nothing appears to be on. A whole load of relays are powered up under the dashboard, just in case, so it's not a good idea to leave the ignition switch in the accessories position, unless you are actually using something, like the radio or a/c fans. Ironically, most driving functions, like lights, horn, wipers and indicators, operate without the ignition being on at all.
There was no obvious solid ground point under the instrument binnacle for the black wire so I took the ground cable out though the front with the steering column cables and used one of the steering column anchor bolts as a ground connection. [Another option is to use the mounting bolt for the fixed end of the door stabiliser strut as a ground point and run a thick black wire along the strut and into the door cavity, ensuring that there is enough slack to allow the door to open fully.]
Choose carefully the location for the switches on the door trim. On the drivers side, there are the steering column and wiper control stalk to consider. I found the most comfortable position on both sides was directly above the existing window winder opening, lower on the drivers side to avoid interfering with the wiper stalk, but higher on the passenger side to avoid it hitting his or her leg. In these positions the cables will fit into the switch module from inside, and above, the horizontal bar under the window ledge. Drill holes as necessary to anchor cables with tie-wraps to avoid them interfering with the window glass as it moves.
Completing the Job
Various size covers are provided in the kit to cover the hole left by the original window winder. You may need to bore out the plastic trim to fit them, or cut them down to size and glue them on. (Or paint a smiley face on the end plate and leave it showing though the hole in the door trim).
When refitting the plastic trim it may be necessary to cut it to fit around the drive belt and motor area, or put up with a slight bulge as I have done.
Once the handles are all back in place you would hardly know that the door now hides a power window system.
Although I haven't done this yet , it is possible to fit a remote control to raise and lower the windows remotely if needed, or when the vehicle is left and locked up, for example. A timer, or better still, a "window up" sensor, would be required so that the window drive motor is not operating for too long. Alternatively, Rapid Electronics sell a Window Lifter module to do just that, for $39. It would need to be wired to the Orange battery wire so that this function can operate without the ignition key in place.
No comments:
Post a Comment