


It occurred to me that we had never provided the specifications for our Oka motorhome on our blog, so here they are:
Our 4WD motorhome was built on a 1994 14 seat XT model Oka bus body, formerly used as a tour bus in Western Australia. It had spent most of its time touring the Kimberly area and had clocked up half a million kms. Fortunately many of the major mechanical components had been replaced or repaired during its working life so we could focus most of our time building the motorhome aspects. The only major mechanical work we had to do was on the springs and suspension.
During 2004 we removed the seats, built a raised roof and fitted it out with all the domestic facilities for 2 people, with the aim of obtaining full self-sufficiency for remote travel for up to 2 weeks at a time.
Construction Progress Photos
For detailed photos of the construction process for the raised roof and internal fit-out visit our photo site here, and select the topic of interest from the sub-album list on the right.

The roof being raised for fitting...

...and lowered on to the Oka.

Just the support beams to remove...

...and the roof fitting is complete. Now for the internal fit out.
Building a motorhome is much like building a house, except smaller and sturdier. There are plumbing, electrical, gas and water supplies to install; sleeping, cooking, showering, toileting, lighting, security and entertainment facilities to provide; storage is needed for food, utensils, tools, spares, clothes, personal effects and outdoor furniture. The design also had to take account of the weather, provision of ventilation, heating, cooling and solar protection and all under severe vehicle shock and vibration conditions plus weight, legal and road safety constraints. It's actually a very challenging but interesting task.
Domestic Arrangements |

Sleeping, showering, cooking and dining facilities for 2 people.
- 4 for dinner is technically possible although a bit squeezy. On our travels usually involve warmer parts of the country so that cooking and eating al fresco is the norm, or at least the eating bit, but we also have an external cooker and BBQ plate.

David, Tim and Brenda (Oka friends from Ocean Shores) and Janet. It was a freezing night at Ormiston Gorge so we ate dinner inside.
- Dometic 3 way 120 L fridge/freezer with:
- Auxiliary thermally controlled fans to aid air flow over condenser fins.
- Internal LED lighting controlled by magnetic reed switch on the door.
- Internal fan to circulate cooling air, thermostatically controlled but stops when the door is opened. Fan is switched off at night, but lights continue to operate.
- Smev 3 burner cooker with oven.
- External Wok cooker/BBQ for al fresco cooking, connected via external gas connection.
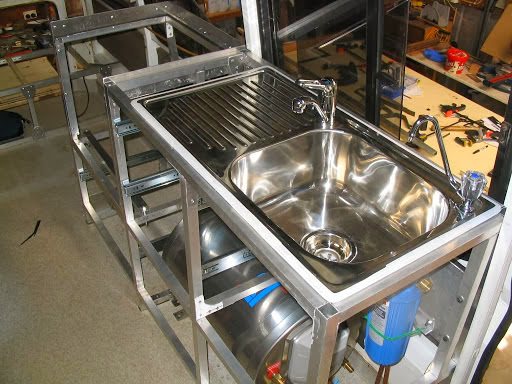
- Sink/drainer with Flickmaster H/C tap and separate tap for filtered drinking water.
- 0.5 Micron drinking water filter.
- Full size shower with hand basin.
- Towel/clothes drying rack over shower when not in use.
- The shower alcove is also used during the day to store laundry equipment, window shades, wine casks and a covered milk crate (makes a great seat, stool, steps, carrying frame).

Shower walls are made of lightweight Aquatile sheeting. Pantry baskets fit between shower and fridge on the same frame.
Water and Gas Supplies
- 100 L stainless steel under-chassis water tank and 150 L (100 L + 50 L) internal flexible water tanks.
- 40 L hot water tank heated from engine coolant circulating though built-in heat exchanger (see this article).
Water heater fitted under the kitchen unit during construction.
- Dual under-floor pressure pumps (because they are noisy) for separate drinking and domestic systems.
- Change over valves to allow either or both pumps or tanks to be used for either purpose.
- Bilge pump for filling tanks from buckets or water sources.
- Dual 4.5kg gas bottles plus 3kg reserve bottle under rear bull bar.
- Manual change over regulator, accessible via a floor hatch, so we know exactly when they run out (this used to be automatic but we didn't always know the gas level until both bottles were empty).

The cockpit of our Oka, at dawn, overlooking Roebuck Bay in Broome.
Navigation and Communications
- Moving map computer navigation system based on:
- MacBook laptop computer in passenger-side dashboard enclosure (MacBook operates in a closed lid configuration driving a larger external display).
- Wireless connection to backup MacMini computer in solid aluminium frame mounted behind the drivers seat.
- 17 inch LCD display (mounted on engine cover).
- External 1.5 Tb back-up hard drive.
- USB TV module.
- USB connection to digital camera.
- 50 W per channel audio output to speaker system, with automatic change over from car radio.
- Laptop running Oziexplorer (under VirtualBox and XP), with DVI cable to LCD display, and networked to Mac Mini.
- USB GPS module connected to laptop.
- Garmin eTrex Venture GPS (with re-radiating antenna) for redundancy and to take on walks.
- NextG phone with external antenna, usable as USB modem for Internet and email access.
- Laptop and/or LCD display is removable to the rear, or outside, to watch TV, DVD's and photos.
- Spare USB keyboard and mouse.
- 12 v dc-dc power supplies for all computer systems.
- Spare PC laptop.

The Moving Map display shows our position in the Great Victorian Desert.
- HF radio (VKS 737 network, call sign Mobile 2484)
- 9 m SuperRod antenna (see here).
- Modified to receive ABC/BBC shortwave stations and 40M Amateur band stations.
- 2 hand held CB's for convoy travel and remote walks.
- Modified to use external roof mounted CB antenna for extra range.
- 406Mhz EPIRB.
- Reversing camera with 9 inch display.
- Auxiliary input for separate side-facing camera.
- 4 channel Tuner/CD system (speakers switched automatically between computer audio or tuner outputs).
Electrics and Lighting
- Bosch 120 amp alternator plus:
- Sterling smart alternator regulator.
- Improved alternator belt tensioner, with adjusting nuts on a tapped rod.
- 3 batteries for starter, domestic and computer systems, each fitted with isolators.
- 3rd battery housed in new frame on LHS behind and below the passenger seat, where LH air filter would be housed, accessible though an external hatch.
- Battery switches to enable all 3 batteries to be manually switched in parallel when necessary.
- Supercharge Gold MF95D31R (760 CCA) starter battery
- 2 x Supercharge MRV70 (105 AH, 760 CCA) Allrounder (Starting and Deep Cycle) house batteries
- 10 x 20w solar panels (see this article) fitted over the cab and along the roof charging 3 batteries plus:
- Charge controller to select any or all batteries to charge.
- Manual or automatic function so it can be switched off when necessary or when the engine (ie the alternator) is running.
- Charge voltage and curent display in rear cabin.
[200 w of solar panels (typically 160 w or 11-12 amps charge current is the maximum available) enables larger capacity house batteries to be used and maybe a larger inverter for a bread maker or similar. We also have a 120 amp alternator and a smart alternator regulator, plus a water heater that heats from the engine water so we really don't need much more than this. Running the engine for 15 mins every couple of days heats the water and tops up all three batteries. In between times, up to 12 amps from our solar panels will keep the essential electrics going (eg computers, lights, pumps, fans, HF radio)].

5 x 20 watt solar panels across the front. Another 5 x 20 watt panels are fitted along the roof.
- Electrical power monitor displays for all 3 batteries.
- LED lighting around the living area and roof lights, replacing previous flouro and halogen lights.
- Cordless drill charger converted to charge from solar panels (since they need around 20v to charge a 14-15v battery).
- External 12 v socket to power pumps, lights, tools etc.
- 300 watt pure sine wave inverter.
- We can run all computers and small domestic appliances from the inverter if necessary.
- Used to drive the modified evaporative air conditioner in the rear (its ac fan motor was retained since it was a waterproof design and would have been difficult to convert to 12 v).
- Dashboard alarm panel for:
- Lights left on.
- Steps left down.
- Low water level in main tank.
- Roof vent left open.
- Water tank level monitors with low level alarm.
- Automatic fridge dc cut off switch on low battery voltage. The fridge dc supply can also be temporarily switched off from the dashboard via a remote relay, to reduce battery load while driving (eg when refuelling or during comfort/photo stops, but should be automatic, run from the alternator).
- Fridge/Freezer temperature monitors with over-temperature and "gas flame out" alarms.
- Automatic fridge lights and air circulation fan.
- Roof vent fan and internal oscillating fans, all speed controlled.
- Quiet window fans (computer fans with speed control) for night time air circulation.
- Smoke alarm with inhibitor:
- Can be turned off during cooking and automatically turns back on after 20 minutes, unless extended.
- Light-sensitive step and porch lights.
- Remote controlled external super-bright LED camping lights.
- Rear under-seat heater and circulation pump to suck heat from a hot engine block or hot water tank (only used in Tassie).
- Diesel pump to transfer fuel between tanks or from Jerry cans.
- Rechargeable torch with SLA battery and 8 super-bright LEDs.
Furniture and Fittings
- Slide out bed in the rear, with 6 inch latex foam mattress, which converts to a lounge seat during the day.

Slide out bed unit during construction.
- Removable dining table stored under seat.
- Pantry with slide out wire baskets.
- Kitchen drawers with steel telescopic slides.
- Locks on all drawers and cupboard doors to keep them shut.
- Vibration has a way of opening even the most secure drawers.
- Deep storage compartment over the cabin (the Black Hole) for light, bulky, seldom used items like engine belts, hoses, jumper leads, rope, cold weather clothing, awning and pop-up screen room.
- Camping chairs and fold-up table stored under rear seat base.
- Library for First Aid kit, sewing kit, DVDs, maps, magazines and, oh yes, lots of books.

Library (with a bespoke door painting by Janet) fitted behind the passenger seat next to the entry door.
- Porta-Potti toilet (can be located in shower alcove or external pop-up toilet tent, also acts as a handy seat).
- AIr conditioning:
- Rear air conditioning redirected to front cabin (see later entry).
- Small evaporative air conditioner for the rear cabin, modified by relocating the water tank to beneath the Oka and fitting an electronic water control system to minimise water usage (provides a 10 sec. shot of water every 2 minutes or so (adjustable) to keep the filter pads damp). Surplus water is captured in a plastic container beneath the Oka for reuse (also useful for hand washing). Air is drawn into the back of the filter pads from the front cabin.

Small evaporative air conditioner fitted above the cab.
- Pop-up 2m square screen room for insect-free relaxing.
- Removable shade awning.
- All windows have custom made reflective screens (using Aircell from Bunnings) to provide heat and light isolation.
- Velcro-ed fly screens on all rear opening windows:
- Secured with a single fixing screw so when they get torn off by branches we don't lose them.
Structural and Mechanical Modifications
- Raised roof with overhead storage cupboards.
- Tool box built into tailgate which also acts as a handy workbench.
- Grey water tank for shower water (looks like a snake tank of the side of the Oka). Holds 25 L (about 2-3 days showering for 2 people) and includes a HepVO self-sealing backflow valve (see here), mounted horizontally, to prevent any unwanted smells.
- Separate 10 L waste tank for sink. Needs to be bigger since we generate more waste water than expected, but we have no room yet for a larger tank.
- Extra fuel tanks (300 L max, 2 x 10⁵ L side tanks plus a rear 50 L plastic tank, plus 1 or 2 Jerry cans as required).
- Extra water tanks (250 L total, 100 L stainless steel tank under chassis for shower and sink, plus 2 x flexible tanks for drinking water under the bed base, 1 x 100 L, 1 x 50L, plus there's always 40 L in the hot water tank if things got that desperate).
- Air compressor based on air conditioner compressor, mounted on LH engine mount, plus 20 L tank and 2 air outlets.
- Separate air hose and tyre inflator (kept inside so it's handy for frequent pressure changes).
- Long handled spade, leveling wedges and air hose mounted on rear wheel carrier.
- Water hoses stored inside rear wheel well.
- Hi-Lift jack (60 inch, 1.5 m) mounted on front bull bar, with 2 plywood base plates kept in rear tool store.
- Extra Hi-Lift jacking points fitted to the front and rear bull bars, (see here).
- Double-acting 3 tonne screw jack and 2 x 3 tonne axle stands mounted in a frame below the rear RHS bull bar.
- Mechanical spares housed in the compartment behind the tailgate, accessible from inside and outside.
- New rear springs with additional 3rd leaf and rebuild front springs with additional 3rd leaf.
- New spring bolt mounting plates on front of rear springs, with replaceable bushes and "unbreakable" 4140 spec steel bolts.
- 20 mm suspension bolts fitted in all other places, and all steel suspension bushes replaced by urethane types (kit from Peter Wright).
- Airbag suspension on all 4 springs, with individual in-cabin pressure controls and gauges.

Dual airbag controls and dual needle gauges mounted either side of the steering column.
Driving Modifications
- Ralph shock absorbers (note: one leaked after 2 years and was replaced free by 4WD1.com).
- Steering damper replaced by larger Tough Dog model (from 4WD1.com).
- Strap fixings for UJ's on yokes replaced by U-bolts for increased strength and reliability.
- Air intake redirected and extended forward to reduce the sucking noise.
- 150mm x 2m PVC pipe across front bull bar to hold awning poles, aerials, rods, pipes etc.
- Spare half spring leaf bolted under the chassis, above the spare wheel.
- Can be used to temporarily replace broken spring eye. It bolts under the spring clamp and supports shackle plate.
- Remote control power door locks, with external hidden switch (see this article). All doors are lockable and unlockable from inside, from any one door, or the remote control.
- Power windows on driver and passenger doors (see this article).
- Start lockout solid-state relay to prevent accidental engine starting from outside the vehicle while in gear, which also acts as vehicle immobiliser.
- It disables the starter solenoid and fuel supply to the injector pump after the ignition is switched on, until an Enable button is pressed on the dashboard.
- It also provides an emergency Engine Stop function by interrupting the dc supply to the injector pump fuel solenoid, until reset by the Enable button.
[I had a near disaster once when I accidentally started the engine in reverse gear while standing outside the drivers door. It started well, but fortunately I had just fixed the handbrake, which stalled the engine before it moved too far, otherwise the Oka would have gone though the garage wall and disappeared down a steep hill.]
- Turbo timer, which keeps a very hot engine running for 30 seconds after the ignition is turned off, to allow the turbo bearings to cool down before their oil supply stops.
- Rear engine-powered air-conditioning redirected to the front via overhead eyeball outlets.


- Wiper delay system with 6 delay times and 1 or 2 cycles per wipe.
- Travelling windscreen washer system.
- All cabin surfaces sound/heat proofed using foam plastic sheeting (1cm thin roll-up camping mattresses) covered with WonderWall carpeting.
- Soundproofing doubled up on engine cover panels using self-adhesive acoustic foam panels from Whitworths (see here).
- Lever action hand throttle (see here).
- 4.5 m fibreglass sand flag pole. Base mounted on front bull bar.
Safety, Maintenance and Recovery:
- We made provision for safety, maintenance and recovery equipments which are described here.
Weight in touring trim:
- 5.4 tonnes (from weigh-bridge in Katherine, with one person plus tanks half full).
Engine Number:
- AB 80483 U 728121 A, where:
- "AB" means a Perkins Phaser 1004-4T (4 Cylinder, 4 Litre Turbocharged) engine type
- 80483 is the build number
- "U" means built in the UK
- 728121 is the serial number
- "A" is the year of manufacture (1995, which means our engine is not the original since our Oka is a 1994 model)
- Refer Perkins Engine Numbering Chart for additional code information
VIN Number:
- 6N 544 B3 M4 RA 080148
- The critical number is the "148" on the end which is the build sequence number (approx 430 Oka's were built in several configurations),
- "B3" means a 14 seat bus with a rear hatch,
- "RA" means built in 1994 in Perth.
- Refer to this chart for an explanation of the Oka VIN numbering sequence.

Oka VIN Number Explanation
Future Modifications:
“Handbrake Left-On” reminder. (Yes, it’s been done a couple of times and I need an audible alarm. The lamp on the dashboard doesn’t work anyway). |
Reclining lounge chairs (I wish).
If you’d like to contact us or would like more information on our motorhome please email us at dandjribbans at gmail dot com and leave a message.
No comments:
Post a Comment