Welcome to David and Janet Ribbans blog

We live in Adelaide, South Australia and enjoy travel in the Australian outback in our Oka 4WD motorhome, hence the blog title.


To quickly locate any of our more than 80 travel and technical articles, use the drop down menus below or scroll down the lists in the right hand sidebar. But please read the disclaimer first, we've tried to be accurate and current but things can change...
You can also visit the official Oka 4WD website here.

Pandora Web Archive


We're now honoured to have our blogs archived
on the National Library of Australia's Pandora Web Archive.
Bookmark this link to the archived version in case anything ever goes wrong with Google, or I accidentally hit "Delete All" in a fit of pique. The drop down menus above might not work in the archived version but everything else should...

Tuesday 13 November 2012

New Oka Owners Group Website

The website for Oka owners (Oka4wd.com) suffered a major crash in October 2012 causing all the forum entries, video links and some photos to become inaccessible. Surprisingly, the hosting company provides no service or tools for customer site back ups. Subsequent pressure on the hosting company did managed to get the forum entries restored but nothing else.Nevertheless, confidence in the host company has been seriously damaged so we decided to build a new and more capable website based on a more robust platform (Joomla).This is still a work in progress but the forums are recovered and back in operation and many of the technical documents have been restored. The site can be visited here or click on the photo below.

Screen%25252BShot%25252B2013-03-07%25252Bat%25252B6.15.44%25252BPM-2012-11-13-09-46.png

We are currently working on a new social extension to the site with Facebook-like functions (although with a rather more serious aspect) which will include comprehensive member profiles, photo and video uploads, events management and group capabilities.

Note 1: This new website is for Oka owners and people with an interest in Okas. It is NOT the Oka Company website which can be found here (no longer accessible as of March 2013, presumably due the intending relocation of the company to Malaysia).

Note 2: In April 2013 the new site was the subject of a hacker attack on the php backend files. This took the website off the air for a few days while it was fixed and the security holes plugged.

Derusting the Oka

Rust holes can occur at several places on an Oka but mostly they are cosmetic and affect only the outer body skin and its support bars. Seldom will the main chassis rust badly.

I’ve found the best solution is to cut out the rusted metal, scape, brush or grind off as much surface rust as possible and coat with RANEX Rusbuster.

IMG_5889-2012-11-13-08-30.jpg

An old paint brush adapted to apply the Ranex

This converts the surface rust to an inert coating which can be directly painted. RANEX is also good for just painting on to rust spots or rusty bolt heads.

I then cover the holes with thin white aluminium sheeting either glued, screwed or pop-riveted on, and smeared sealant around the edges to keep water out.

Common rust areas are:

IMG_5882-2011-06-30-13-45.JPG-2012-11-13-08-30.jpg

Front side rust hole (both sides). The cross member is badly rusted.

IMG_5883-2011-06-30-13-45.JPG-2012-11-13-08-30.jpg

Rust hole where the windscreen meets the front scuttle.

IMG_5885-2011-06-30-13-45.JPG-2012-11-13-08-30.jpg

Rust hole where near the air filter

IMG_1331cropped-2012-11-13-08-30.jpg

Hole covered with a thin plate

IMG_7421-2012-11-13-08-30.jpg

The rust hole covered by a thin plate, the sealant has attracted dust from a subsequent trip

Clutch, from Michael Hession, Feb 2004

Clutch Problem - From Michael Hession, Feb 2004:
While we were away in Victoria, just after Christmas, we had to have our clutch replaced. The reason being, the Thrust Bearing failed and damaged the fingers of the clutch pressure plate. The bearing failed due to incorrect free-play adjustment. The clutch face was in good repair, but the pressure plate was unserviceable due to the damaged fingers. Two points that came out of this exercise were:
  1. Clutch Type
  2. Thrust Bearing Free-Play Adjustment.
1. Clutch Type
The standard clutch as fitted to all OKAs is a ceramic clutch and as OKA state in the owners manual, should not be slipped. If you do slip the clutch you will cause rapid wear to the clutch, pressure plate and flywheel. The ceramic clutch was fitted as early testing showed failure of an "organic" clutch. An organic clutch plate is what most people would recognise as a normal clutch plate.
It was recommended by Andrew Kee of Whitehorse Trucks (ex OKA dealers in Morwell, Victoria) that I replace my clutch with an organic type. He had supplied some ten of these to various OKA owners and had had no problems. The advantages being that the clutch can take some slip without undue wear or problems, and it is much softer on the drive-train giving a smoother take-up of the load.
The new NT OKA has an Organic Clutch. I have since learnt that Paul Nott is a good source. The clutch that was fitted to my vehicle is made by Daikin and if you go on their website you will find they have a listing for OKA (WA) and the part numbers start with OK.2. Thrust Bearing Free-Play Adjustment
Terry of Eastside Trucks, Morwell, carried out the repairs to my vehicle. He explained that it is a common problem, that he has found a lot of OKAs have the free play on their clutches incorrectly adjusted. Too often the thrust bearing is under load and therefore working (turning) continuously, leading to early failure of the thrust bearing, or at worst a slipping clutch.To ensure that it is adjusted correctly the following procedure needs to be followed:
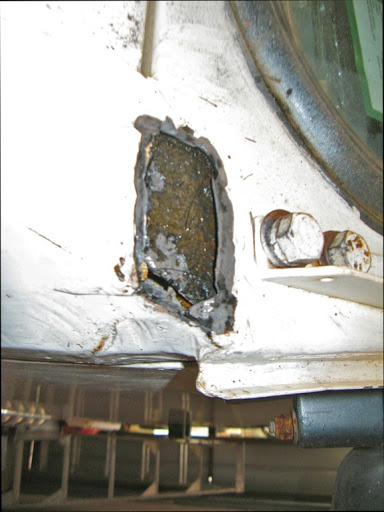
        1.        Remove the inspection plate from the bottom of the bell housing (6 screws). Some vehicles will have a grease nipple for greasing the thrust bearing.
        2.        With the plate removed you will be able to see the side of the thrust bearing. With a long screw driver you should be able to freely rotate the bearing with the clutch disengaged.
        3.        If the bearing turns freely, all is good so far. Have someone operate the clutch pedal. As they slowly push the pedal down, you keep on turning the bearing until it stops. At this point the clutch pedal should have moved about 25mm; if so your free-play is adjusted correctly.
        4.        If the bearing does not turn freely, you either have a seized bearing or more likely not enough free play. You will need to adjust the free play by adjusting the adjustment bolt, which is on the opposite side of the bell housing to the clutch lever arm. N.B. Too much free-play will make it difficult to disengage the clutch.
        5.        You will need to test your setting to make sure you can still disengage the clutch.